To get support, feel free to open issue report in our GitHub repository.
Alternatively, you can always find us on the Discord and Matrix.
This project is developed by the community, consider supporting us on OpenCollective or Patreon.
Contributions
Feel free to contribute to this documentation by just clicking the
button displayed on top right of each page.
For contributing to OpenNox project itself, see the main repository.
License
This project (OpenNox) is an unofficial community collaboration project for preservation, modding and compatibility purposes.
This project has no direct affiliation with Electronic Arts Inc. and/or the “Nox” brand. “Nox” is an Electronic Arts Inc. brand. All Rights Reserved.
No assets, texts, artwork or other media from the original game(s) is included in this project.
We do not condone piracy in any way, shape or form and encourage users to legally own the original game.
OpenNox doesn’t provide Nox assets. You must own a copy of the original game and have it installed in order to run it.
OpenNox will attempt to find Nox installation automatically.
OpenNox is able to connect to vanilla Nox servers, as well as vanilla Nox clients are able to connect to OpenNox servers.
This is only true for regular version of OpenNox. OpenNox HD will refuse to connect with non-HD (legacy) players.
Graphics
OpenNox can load vanilla Nox content and should work on any recent Windows and Linux versions with no graphical issues.
Additionally, OpenNox provides an HD version, which allows using display resolutions up to 4K.
OpenNox HD will refuse connections from non-HD/legacy version and from vanilla Nox, because fairness considerations.
OpenNox supports custom TTF and OTF fonts to replace vanilla raster fonts.
Multiplayer
Vanilla Nox distinguishes between online and LAN multiplayer. It uses XWIS server and requires login/password for it.
OpenNox combines both online and LAN games into a single list. It doesn’t require XWIS password, while still able to join XWIS servers.
OpenNox also attempts to automatically forward ports, when hosting a game online.
This requires UPnP to be enabled on your router (which is enabled by default in most cases).
OpenNox provides a headless dedicated server both for Linux and Windows.
OpenNox servers expose a simple HTTP API for getting server information,
which allows easy integration with websites, Discord bots, etc. The same API provides a simple Web control panel for the server.
Game
OpenNox improves a few aspects of the game to make it more convenient to players, or to provide more options.
Appimage is a portable packaging format designed to simplify user interaction with software by removing the need to install it as a package or install its dependencies.
32 bit Appimage packages are provided since v1.8.12-alpha9 (25 Aug 2023).
The Appimage contains all 3 executables: non-hd client, hd client and dedicated server.
The Appimage release is not portable by default – it overrides config location and data location to use user’s home folder conforming to Freedesktop standard “XDG Base Directory Specification v0.8”. This is done specifically to allow making packages out of this AppImage and to allow direct system installation (in /usr/local/bin for example).
Paths used by the Appimage release
Please note, that $HOME is either user’s home or a portable home, depending on how you install OpenNox.
Game files are expected to be in this directory: $HOME/.local/share/opennox
Game configuration files are expected to be in this directory: $HOME/.config/opennox
Game logs will be put into this directory: $HOME/.local/state/opennox
Prerequisites
Внимание
OpenNox is not a full game. It requires game content files of the original Nox installation!
See GoG for purchase options.
Original CD should work as well.
Most probably, you are using 64 bit distribution of Linux. To use OpenNox you have to enable i386 architecture and install these packages:
libc6:i386
libfuse2:i386
zlib1g:i386
Make sure you have 32 bit version of your graphics drivers installed to provide libgl1:i386.
On 32 bit distributions you probably have everything installed already.
Installation process (standard usage)
Download the Appimage file from the Opennox releases page. Put it anywhere you think is appropriate and mark it as executable.
Copy Nox content files into the $HOME/.local/share/opennox folder. Alternatively, you can install Nox into this folder.
(Optional) If you are migrating from binary release, please put opennox.yml into $HOME/.config/opennox folder.
Installation process (portable)
Download the Appimage file from the Opennox releases page. Put it anywhere you think is appropriate and mark it as executable.
Create portable home folder for the Appimage by running it with parameter –appimage-portable-home or by creating a folder with the same name as the Appimage and “.home” appended to the end. If Appimage file is opennox-bundle-i386.AppImage, then portable home folder must be named opennox-bundle-i386.AppImage.home.
Copy Nox content files into the .local/share/opennox folder inside the portable home folder you had created in step 2.
(Optional) If you are migrating from binary release, please put opennox.yml into the .config/opennox folder inside the portable home folder you had created in step 2.
Running the Appimage
Appimage release always checks the first parameter to decide which executable to run.
To run OpenNox (legacy version), simply run the Appimage file.
To run OpenNox HD, run the Appimage file with “hd” parameter as the first parameter.
To run OpenNox dedicated server, run the Appimage file with “server” parameter as the first parameter.
To get help about this Appimage release, run the Appimage file with “help” parameter as the first parameter. The help explains how to use Appimage and where files should be placed.
Troubleshooting
OpenNox doesn’t start
Try starting OpenNox from the terminal. Check if there are any error messages there.
Make sure you have Nox game files in $HOME/.local/share/opennox folder.
If nothing helps, please contact us on OpenNox Discord in #feedback channel and share the opennox.log located in the .local/state/opennox folder.
Can’t connect to a server: Version mismatch
HD and legacy versions won’t join servers of the opposite version.
Most online servers still run legacy version, so if you want to join them, you must run legacy version of OpenNox as well.
Binary archive release
Release information
This release is just OpenNox binaries packed into tar.gz archive.
Prerequisites
Внимание
OpenNox is not a full game. It requires game content files of the original Nox installation!
See GoG for purchase options.
Original CD should work as well.
To run OpenNox you will need to install this dependencies:
libc6:i386
libopenal1:i386
libsdl2-2.0-0:i386
Make sure you have 32 bit version of your graphics drivers installed to provide libgl1:i386.
Unpack tar.gz archive contents into folder of your choice.
Mark files opennox, opennox-hd and opennox-server as executable.
Copy Nox content files into your $HOME/Nox folder. Alternatively, you can install Nox into this folder.
Running the game
You need to create launchers yourself for executables you want to run.
Please note, that working directory must be set to the Nox installation folder.
Running from terminal
Информация
Navigate to the Nox installation folder, before running any of these commands.
To run OpenNox Non-HD (legacy), issue this command:
opennox
To run OpenNox HD, issue this command:
opennox-hd
To run OpenNox dedicated server, issue this command:
opennox-server
Информация
If you placed binaries not Nox installation folder, you have to provide a full or relative path to the binary.
Troubleshooting
OpenNox doesn’t start
Try starting OpenNox from the terminal. Check if there are any error messages there.
Make sure you have put binaries into your Nox installation folder or have game files in the $HOME/Nox directory or in the place specified in opennox.yml (which can be either in $HOME/.config/opennox or in the working directory used to call binaries from):
game:data:/home/user/some/path/to/Nox
Change this path manually to a folder where your copy of Nox is installed, if necessary. Restart OpenNox.
If nothing helps, please contact us on OpenNox Discord in #feedback channel and share the opennox.log located in the $HOME/snap/opennox/common/logs folder.
Can’t connect to a server: Version mismatch
HD and legacy versions won’t join servers of the opposite version.
Most online servers still run legacy version, so if you want to join them, you must run legacy version of OpenNox as well.
Flatpak release
Package information
Flatpak is a packaging format designed to simplify user interaction with software by removing the need to install its dependencies.
Flatpak package is provided since v1.8.12-dev (0a8352c) (13 Jan 2023).
Flatpak package supplies only 2 executables: non-hd client and hd client.
Prerequisites
Внимание
OpenNox is not a full game. It requires game content files of the original Nox installation!
See GoG for purchase options.
Original CD should work as well.
Copy Nox content files into your $HOME/Nox folder. Alternatively, you can install Nox into this folder.
Running the game
After installing you should get two launchers in your applications menu: OpenNox and OpenNox HD. Run the one you need.
Running from terminal
To run OpenNox Non-HD (legacy) issue this command:
flatpak run io.github.noxworld_dev.OpenNox
To run OpenNox HD issue this command:
flatpak run --command=opennox-hd io.github.noxworld_dev.OpenNox
Troubleshooting
OpenNox doesn’t start
Try starting OpenNox from the terminal. Check if there are any error messages there.
Make sure you have Nox game files in $HOME/Nox or in the place specified in $HOME/opennox.yml:
game:data:/home/user/some/path/to/Nox
Change this path manually to a folder where your copy of Nox is installed, if necessary. Restart OpenNox.
If nothing helps, please contact us on OpenNox Discord in #feedback channel and share the opennox.log located in the logs folder, which is located either in your home folder or in OpenNox working directory.
Can’t connect to a server: Version mismatch
HD and legacy versions won’t join servers of the opposite version.
Most online servers still run legacy version, so if you want to join them, you must run legacy version of OpenNox as well.
Snap release
Package information
Snap is a packaging format designed to simplify user interaction with software by removing the need to install its dependencies.
Snap package is provided since v1.8.6 (19 Dec 2021).
Snap package supplies all 3 executables: non-hd client, hd client and dedicated server.
Prerequisites
Внимание
OpenNox is not a full game. It requires game content files of the original Nox installation!
See GoG for purchase options.
Original CD should work as well.
Copy Nox content files into your $HOME/Nox folder. Alternatively, you can install Nox into this folder.
Running the game
After installing you should get two launchers in your applications menu: OpenNox and OpenNox HD. Run the one you need.
Running from terminal
To run OpenNox Non-HD (legacy), issue this command:
snap run opennox
To run OpenNox HD, issue this command:
snap run opennox.hd
To run OpenNox dedicated server, issue this command:
snap run opennox.server
Troubleshooting
OpenNox doesn’t start
Try starting OpenNox from the terminal. Check if there are any error messages there.
Make sure you have Nox game files in $HOME/Nox or in the place specified in $HOME/opennox.yml:
game:data:/home/user/some/path/to/Nox
Change this path manually to a folder where your copy of Nox is installed, if necessary. Restart OpenNox.
If nothing helps, please contact us on OpenNox Discord in #feedback channel and share the opennox.log located in the $HOME/snap/opennox/common/logs folder.
Can’t connect to a server: Version mismatch
HD and legacy versions won’t join servers of the opposite version.
Most online servers still run legacy version, so if you want to join them, you must run legacy version of OpenNox as well.
Установка на Windows
Установка
Внимание
OpenNox не является отдельной игрой. Он требует установки оригинала Nox!
См. GoG или Origin для покупки.
Оригинальный CD так же должен сработать.
Установить оригинальный Nox. Предпочтительно, вне папки “Program Files”.
Скачать последний установщик OpenNox. Использовать файл .exe для Windows.
Установить его в любую директорию (отдельно от директории оригинального Nox).
Запуск
HD версия
Перейти в директору где установлен OpenNox.
Сделать ярлык на opennox-hd.exe.
Запустить его!
Информация
HD версия не будет подключаться к публичным серверам старого Nox или OpenNox legacy!
Это сделано для обеспечения честности, т.к. не все игроки используют OpenNox HD и не видят так же далеко как в HD.
Вы все ещё можете создать свой сервер для того чтобы играть с друзьями в HD версию.
Legacy версия
Перейти в директору где установлен OpenNox.
Сделать ярлык на opennox.exe.
Запустить его!
Информация
Legacy версия не будет подключаться к публичным HD серверам!
Удостоверьтесь что использует версия совместимая с сервером при игре по сети (HD или совместимая).
Устранение проблем
OpenNox не запускается
Во первых, можно попробовать запустить OpenNox с правами администратора.
Если это сработало, значит Nox установлен в защищенную директорию вроде “Program Files” что вызывает проблемы с доступом.
Удалите папку OpenNox, переустановите Nox в другую директорию и установите OpenNox снова.
Если это не помогло, откройте opennox.yml (в директории куда установлен OpenNox) с помощью текстового редактора (Notepad++ это лучший вариант).
Найдите секцию похожую на:
game:data:C:\Games\Nox
Измените путь в файле на папку куда установлена копия Nox. Перезапустите OpenNox.
Если это тоже не сработало, пожалуйста обратитесь за помощью в OpenNox Discord в канал #feedback.
Так же поможет если вы приложите файл opennox.log который находиться в капке log в директории OpenNox.
Can’t connect to a server: Version mismatch
Как было указано в документации по установке, HD и legacy версии не будут присоединяться к серверам друг друга.
Большинство публичных серверов до сих пор используют legacy версию, по этому если вы хотите присоединиться к ним,
вам необходимо использовать legacy версию OpenNox.
Удостоверьтесь что используете правильную версию когда пробуете присоединиться к серверу.
Install on Steam Deck
Заметка
This guide is based on Linux installation guide.
Specific Steam Deck guide will be provided in the future as well.
Installing
Внимание
OpenNox is not a standalone game. It requires a copy of original Nox installed!
Installation should create a “OpenNox HD” shortcut in the start menu. Alternatively: run opennox-hd binary from terminal.
Информация
HD version will not join public legacy servers!
This is done for fairness reasons, since not everyone runs OpenNox in HD. You can still host your own server for your friends to join.
Legacy version
Installation should create a “OpenNox” shortcut in the start menu. Alternatively: run opennox binary from terminal.
Информация
Legacy version will not join HD servers.
Make sure to run the same version as the server when playing online.
Troubleshooting
OpenNox doesn’t start
Try starting opennox from the terminal. Check if there are any error messages there.
If it doesn’t help, open opennox.yml in OpenNox installation directory in a text editor. Find section similar to this:
game:data:/home/user/some/path/to/Nox
Change the path manually to a folder where your copy of Nox is installed. Restart OpenNox.
If it still doesn’t work, please ping us on OpenNox Discord in #feedback channel.
It will help if you share opennox.log located in log folder in OpenNox install directory.
Can’t connect to a server: Version mismatch
As was explained in the installation section, HD and legacy versions won’t join servers of the opposite version.
Most online servers still run legacy version, so if you want to join them, you must run legacy version of OpenNox as well.
Make sure to try a correct version when joining a server.
Игра
Этот раздел содержит дополнительную информацию об уникальных игровых возможностях OpenNox.
OpenNox provides more commands for Nox Quest game mode.
Originally, Nox Quest:
Prevents players to skip levels if they haven’t completed them already
Skips only 5 levels at a time.
Disables the portal after level 20.
Even if portal cutoff is increased to more than 20, it won’t teleport to next levels.
To solve all of this, you can run (in the game console; F1):
racoiaws
set quest warp.allow
set quest warp.inc 10
set quest warp.inf
For more detailed description of commands, read on.
warp.allow
This option disables the requirement to complete a certain Quest level before accessing the portal.
Example:
# always allow to pass through the portal
set quest warp.allow
set quest warp.allow 1

# original Nox behavior
set quest warp.allow 0
warp.inc
Changes the number of levels that the portal skips at a time.
Example:
# portal will only skip one level instead of 5
set quest warp.inc 1
# skip 20 levels
set quest warp.inc 20

# original Nox behavior
set quest warp.allow 5
warp.inf
Allows the portal to work indefinitely instead of shutting down at level 20.
Example:
# portal will always be enabled
set quest warp.inf
set quest warp.inf 1

# original Nox behavior
set quest warp.inf 0
level.inc
Changes the number of levels that will be skipped on the stage completion.
In other words, how quickly the levels will increase when you complete a Quest level.
This allows to ramp up difficulty much faster without affecting other Quest rules.
Example:
# completing level 5 will lead to level 7 (+2) instead of 6 (+1)
set quest level.inc 2

# original Nox behavior
set quest level.inc 1
Multiplayer campaign
Внимание
This mode is highly experimental! You will encounter bugs.
You must restart the game after playing in this mode. Otherwise, game session and the menu will likely be broken.
Starting campaign in multiplayer
Host regular Quest game.
Wait for all players to join.
Open game console with F1 and type racoiaws (enables console commands).
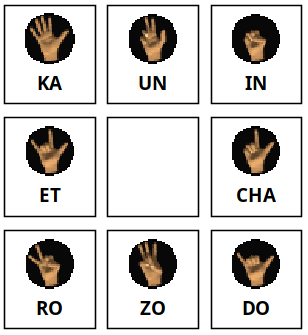
Surprisingly, vanilla Nox has a hidden feature that allows casting spells manually by pressing one of 9 phoneme/gesture
keys in the right order to cast specific spells. It is similar to the way spell casting works in Magicka.
OpenNox restores this feature by default. Manually casting each spell is challenging, thus we think that it doesn’t
give any advantage in multiplayer (actually the opposite), so can be enabled safely.
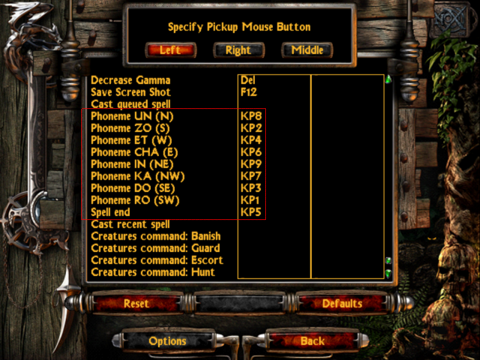
All that needs to be done to use it to set hotkeys in OpenNox input options.
There are 8 main phonemes, plus a special “end” phoneme to finish and cast the spell.
It’s typical to use numpad keys for phonemes where 5 or Enter is an “end” phoneme, and actual phonemes occupy other number keys:
Another typical layout is to use QWER-ASDF block for 8 phonemes and set “end” to any key that is close enough.
The simplest way to host Nox game is via OpenNox game client.
Run OpenNox or OpenNoxHD, go to “Network”, and host the game. Simple as that!
OpenNox will automatically register the game online (for both OpenNox and Nox Reloaded).
It will also attempt to automatically open ports for the game (via UPnP on your router).
Информация
Servers hosted with OpenNoxHD version will not allow non-HD clients!
This is done for fairness reasons. Since not everyone runs OpenNox in HD,
it will significantly limit their vision distance, giving too much advantage to HD players.
Хостинг выделенного сервера
OpenNox also ships with the opennox-server binary which can be used to run as a dedicated server.
Классический Nox хранит параметры игрового баланса в закодированном файле gamedata.bin.
OpenNox позволяет переопределять значения указанные в этом файле теми, что записаны в текстовом файле gamedata.yml.
Для пробы скопируйте gamedata.yml в папку с установкой Nox (не в папку OpenNox!).
После этого, вы можете редактировать этот файл с помощью любого текстового редактора (Notepad++ рекомендуется для Windows пользователей).
Изменение заклинаний
Vanilla Nox stores spell configs in three different places:
The engine defines a list of all supported spell IDs (e.g. SPELL_BLINK) and the effect associated with it.
The thing.bin then lists spells that should be enabled in the game (by ID) and additionally configures them.
Unfortunately, this configuration is quite limited.
The balance file may additionally tune per-level spell parameters,
or special parameters that are unique to certain spells.
OpenNox extends this system and allows using spells.yml file to configure new spell parameters, as well as old ones in one place.
Note: this modding feature is still in development. Not all the config options for spells are available in spells.yml.
We will keep adding new ones in each version of OpenNox.
Generating base spells.yml file
Since this feature is in the development, it is strongly advised to generate a fresh spells.yml based on the latest
OpenNox version and your Nox game data.
This can be done by running OpenNox with NOX_DUMP_SPELLS=true environment variable.
On Linux:
NOX_DUMP_SPELLS=true opennox
On Windows (via cmd.exe):
set NOX_DUMP_SPELLS="true"
opennox.exe
This should create a spells.yml in Nox game data directory (not OpenNox directory!).
Alternatively, you could copy the spells.yml file to your Nox game directory.
Be aware that the sample file might be old and won’t list all options available in the engine.
Modifying spells.yml
Note that modifying spells.yml currently requires OpenNox restart.
Here, a count parameter is omitted, because it is usually controlled via balance file (see MagicMissileCount).
Specifying it here will override balance data.
When a special section like missiles this is present, all parameters in there can be controlled individually for each spell level:
missiles:# default parameters for all levelsspread:16projectile:MagicMissilevel_mult:0.1offset:4speed_rnd_min:0.80000001speed_rnd_max:1.2search_dist:600# per-level configslevels:# levels 1-3: copied from balance file- count:1- count:2- count:3# level 4: same number of missiles as lvl3, but longer homing distance- count:3search_dist:800# level 5: make it ultimate: more missiles, longer distance, faster missiles- count:10speed_rnd_min:1.0speed_rnd_max:2.0search_dist:800
Spell flags
Not all flags are completely understood at this point. So we recommend to see what flags are set for existing spells
and experiment by setting/unsetting them in your mod.
Names of the spell flags provided below may change in a freshly-generated spells.yml,
but OpenNox will still support old names as well.
Player class flags:
CLASS_ANY - spell can be used by any magic class (Conjurer and Wizard)
CLASS_WIZARD - spell can only be used by Wizard
CLASS_CONJURER - spell can only be used by Conjurer
Setting none of these flags will effectively hide the spell.
Targeting flags
TARGETED - spell is homing
AT_LOCATION - spell can be cast at a point
CANT_TARGET_SELF - spell cannot be targeted at the character
Cast flags:
NO_MANA - spell doesn’t require mana
NO_TRAP - spell can’t be used in traps
INSTANT - spell is instant
DURATION - spell is duration-based
OFFENSIVE - spell is offensive
DEFENSIVE - spell is defensive
CAN_COUNTER - spell can be countered
MOBS_CAN_CAST - mobs are allowed to use this spell
CANT_HOLD_CROWN - spell can’t be cast when holding a flag/crown/ball
Special flags
SUMMON_SPELL - this is the base Summon Creature spell
SUMMON_CREATURE - this is Summon for a specific creature
MARK_SPELL - this is the base Mark Location spell
MARK_NUMBER - this is Mark Location with a specific number
GOTO_MARK_SPELL - this is the base Go To Mark spell
GOTO_MARK_NUMBER - this is Go To Mark with a specific number
There are some flags that don’t have names, which means we are not sure of its effect.
Adding new spells
Currently, adding new spells in OpenNox is not supported.
Having said that it is possible to replace unused spell slots that already exist in the game.
In spell section there’s a name parameter that defines the slot that the spell uses
and effect for the engine to know which effect to run.
Usually these two IDs are the same (or effect is empty and derived from name), but these fields can be used to replace
unused spell IDs with custom ones.
For example, there’s SPELL_PHANTOM which doesn’t appear in the game and has no effect in the engine.
This gives us a free spell slot to use. Let’s replace it with a custom magic missiles (SPELL_MAGIC_MISSILE) variant.
For this we need to set name: SPELL_PHANTOM (or find existing section with it) to specify which slot we are using,
and set effect: SPELL_MAGIC_MISSILE for the engine to know which logic to use for it. The result should look like this:
name:SPELL_PHANTOM# replacing Phantom spell sloteffect:SPELL_MAGIC_MISSILE# but effect is based on Magic Missilesphonemes:[un, ro, do]# phonemes must be unique, so we keep ones from Phantom# the rest is copied from Missiles and modifiedicon:ind:18248icon_enabled:ind:131967mana_cost:50price:5000flags:- AT_LOCATION- MOBS_CAN_CAST- OFFENSIVE- CAN_COUNTER- CANT_TARGET_SELF- CLASS_WIZARD- 536870912- 1073741824title:thing.db:MissilesOfMagicdesc:thing.db:SPELL_MAGIC_MISSILE_DESCcast_sound:MagicMissileCastmissiles:count:5spread:30projectile:MagicMissilevel_mult:0.1offset:4speed_rnd_min:0.1speed_rnd_max:0.3search_dist:800---
Замена изображений
The main build supports a way to replace sprites used by the game.
For it to work, you may first need to get original sprites:
cd Nox
noxtools videobag extract -z --out ./video.bag.zip
Find sprites that you want to replace and put them into Nox/images (create if not exists).
Make the changes to the sprite in this directory and run the game to test it.
Note that it will ONLY work with this Nox version. Original Nox, GoG version or Nox Reloaded doesn’t support this.
Adjusting sprite offsets
If you decide to change the sprite significantly, e.g. changing its size or completely redrawing the image,
you may need to change the sprite offset used by the engine.
First, get the original sprite metadata:
cd Nox
noxtools videobag extract -z --out ./video.bag.zip --json
Now this archive will contain .json files that correspond to each sprite. Copy selected ones to Nox/images,
adjust the offsets using the text editor and check them in game.
Изменение перевода
Most of the text used in Nox is stored in the CSF files which are encoded and are hard to modify.
This build provides an easier way to customize those texts.
First, decode the original file:
noxtools strings csf2json nox.csf
This will produce nox.csf.json file that you can modify with a regular text editor.
The build will automatically use this file instead of the original nox.csf.
The nox.csf.json file will consist of sections similar to this:
{"id":"ParseCmd.c:exithelp","vals":[{"str":"Exit the game to Main Menu."}]}
For translation Nox texts to a different language (or changing existing texts),
you need to keep the id field, but translate all str fields.
For adding custom strings, you need to add a new section with a unique id add at least one str.
Then you should be able to use this new id in your map or mod.
Scripts
OpenNox provides multiple scripting runtimes. Some of them are experimental or in development.
Walls in Nox are positioned on a regular grid. Thus, walls can be addressed by those grid positions.
If walls are marked as scriptable in the editor, it will be possible to enable (close) and disable (open) them.
Spawn 2 Beholders and make them follow the player:
beholder = Nox.ObjectType("Beholder")
p = Nox.Players.host
arr = {}
for i = 1,2 do
    arr[i] = beholder:Create(p)
end
squad = Nox.ObjectGroup(unpack(arr))
squad:SetOwner(p)
squad:Follow(p)
Make a train of 5 Bombers that follow each other and the player:
function trainFollow()
    p:Print("Bomber train!")
    prev = p
    for i, b in ipairs(bombers) do
        b:Follow(prev)
        prev = b
    end
end

function makeTrain()
    bomber = Nox.ObjectType("Bomber")
    p = Nox.Players.host
    bombers = {}
    for i = 1,5 do
        bombers[i] = bomber:Create(p)
    end
    train = Nox.ObjectGroup(unpack(bombers))
    train:SetOwner(p)
    -- give them a frame or two to appear
    Nox.FrameTimer(2, trainFollow)
end

makeTrain()
Разработка
Информация про движек OpenNox.
Подразделы Разработка
Консоль OpenNox
Enabling all commands
By default, Nox and OpenNox start with most commands disabled. This is done to prevent cheating in campaign.
Most commands will not work in multiplayer, unless you are a server admin/host.
To enable all commands, open the console (F1 by default) and type:
racoiaws
Remote console
OpenNox does not support original RCON protocol.
Instead, it implements remote console via a builtin SSH server.
List commands
To get a list of all available commands, use help.
Here’s the list of the most interesting ones.
image
Take a screenshot and save it as a PNG image.
image
show
This command contains various helpers for debugging.
Available sub-commands:
show bindings - show console bindings (macros).
show extents - show names and sizes for all object on the screen.
show ai - show AI paths and print all AI decisions to console.
show gui - shows or hides graphical user interface.
list
This command list various in-game spells, items, monsters, maps and players.
These commands print item IDs that can be the used with spawn command.
Available sub-commands:
list staffs - list all staffs and wands.
list armor - list all armor.
list weapons - list all weapons.
list food - list all consumables.
list monsters - list all monsters and NPCs.
list spells - list all spells.
list maps - list all maps.
list users - list all players.
load
This command switches current game map to the one specified:
load wiz01a
In vanilla Nox, not all maps can usually be loaded. For example, it’s impossible to load campaign maps in multiplayer.
OpenNox allows removing those restrictions via set maps allow.all.
set god
A vanilla cheat for invulnerability, all spells and infinite mana.
set god
To disable:
unset god
Note that using this cheat will cause the character to learn all spells up to the maximal level.
This cannot be reversed, even if the cheat is disabled.
See cheat god if you only need invulnerability and infinite mana.
set quest
These commands allow more controls for Nox Quest game mode. See this page for details.
set maps
These commands allow more controls for game map loading.
set maps allow.all - disable game mode checks when loading the map; allows loading campaign in multiplayer, etc
Для быстрого ознакомления с NoxScript, см как начать.
Некоторые из вопросов могут быть уже покрыты в Q&A.
Так же доступны примеры.
Если вопросы не нашли ответа, можно задать их здесь
или в нашем Discord.
Подразделы NoxScript
Как начать
Это руководство поможет создать ваш первый скрипт используя интерфейс скриптов OpenNox на языке Go.
Первые шаги
Заметка
Удостовертесь что у вас установлен OpenNox. Оригинальный Nox, Reloaded или иная версия не будут работать!
Чтобы создать ваш первый скрипт, скопируйте существующую папку одной из карт, либо создайте новую карту в редакторе.
Если карта была скопирована, удостоверьтесь что файл карты внутри папки тоже был переименован.
Готово! Теперь запустите карту в OpenNox, откройте консоль и вы должны увидеть там сообщение hello!.
Информация
Вам не нужно устанавливать Go или какой-либо другой компилятор чтобы писать скрипты для OpenNox.
Тем не менее, правильная настройка Go поможет включить поддержку IDE, проверку типов в скриптах, автодополнение и т.д.
По этому, мы крайне советуем это сделать.
Полная настройка
Для полной настройки нам понадобиться:
Go 1.20+ (для проверки типов, работы с зависимостями)
Скриптовые движки работают следующим образом: обычно один из движков явлется остновным (NS4 в данном случае),
который предоставляет весь функционал доступный в OpenNox. Остальные движки являются лишь слоем поверх него.
Тем не менее эти слои важны! Они предоставляют уже знакомый интерфейс для разработчиков карт (например NS3 или EUD).
Благодаря этому, полность безопастно использовать несколько движков в одной карте. Если есть опыт в NS3 - лучше начать с него.
Если вы только начинаете разбираться с Nox скриптами - выбирайте последний NS движек (NS4).
Ссылки выше ссылаются на документацию языка Go для каждого из движков - это основной источник документации по функциям и классам доступным в каждом из движков. Это руководство даст лишь базовое знание про настройку скриптов.
Использование движков
Тогда, как использовать эти движки?
Если вы пропустили полную настройку, то для это нужно лишь добавить import в Go файл и использовать его:
Можно заметить что мы вызываем IsTalking без префикса ns3.
Это, тем не менее, не типично для Go, т.к. из кода не понятно объявлена ли функция IsTalking в карте или в другом пакете.
Теперь, возвращаясь к полной настройке IDE, вы могли заметить что импорты не были опознаны.
Это происходит потому что нам нужно обновить зависимости проекта в go.mod. Мы можем сделать это двумя способами:
go mod tidy в терминале (требует Git).
Либо навести мышку на нераспознанное имя импорта, выбрать Quick fix..., и далее go get ....
В обоих случаях зависимости должны загрузиться (то есть тот NS движек который вы выбрали) и добавиться в go.mod.
Теперь автодополнение должно работать корректно для пакетов движка.
Обновление движков
Скриптовые движки периодически обновляются в OpenNox чтобы добавить новые возможности или исправить ошибки.
Это делаться автоматически, новый релиз OpenNox подключит новый движек без каких либо действий со стороны разработчика карт.
Тем не менее, IDE не будет распознавать новые функции движка до тех пор пока они не обновяться в проекте карты.
Самый простой способ обновить это открыть файл go.mod в папке карты и найти строку с движком который нужно обновить:
require (
    github.com/noxworld-dev/noxscript/ns/v4 v4.3.0
    // ... other lines
)
Просто обновите версию в нем, и запустите go mod tidy.
Полный список версий доступен при нажатии на версию в документации пакета скриптов
а так же на GitHub.
Пакеты
Теперь мы знаем как подключить движки скриптов и запускать скрипты. Как же лучше структурировать код?
В Go, единичным проектом является “пакет” (package): директория с одним или несколькими Go файлами.
Имена самих Go файлов не имеют значения, единственное требование это то что все файлы в директории должны иметь одинаковую
строку package в начале файла. OpenNox так же добавляет ещё одно ограничение: package должен совпадать с именем карты.
В остальном, организация кода полностью зависит от вас. Все функции и переменные обхявленные в одном файле
доступны во всех других файлах в этой директории.
Как я могу …
Это руководство лишь поверхностно, в паре шагов показывает как работать со скриптами.
Возможно вам так же интересно поближе познакомиться с языком Go. Язык очень простой, по этому это не должно составить труда.
Интерактивный Go тур является хорошим местом чтобы начать.
Некоторые из вопросов могут быть уже покрыты в Q&A.
Так же доступны примеры.
Если вопросы не нашли ответа, можно задать их здесь
или в нашем Discord.
Примеры
На этой странице приведен список примеров скриптов для OpenNox.
Here you can find a full list of functions provided by NS3 runtime.
History
Vanilla Nox has its own script runtime based on compiled source files. Since original Nox editor was never released,
community recreated the script compiler from scratch.
Since there’s no official version, the scripts had different dialects, one of the latest is known as NoxScript 3.
There’s also a Panic’s EUD compiler that uses memory manipulation to extend script functionality.
OpenNox supports vanilla scripts with no changes required. Additionally, it implements a more advanced script runtime.
New runtime
To make the transition to the new script runtime smoother, OpenNox provides a compatibility layer for NoxScript 3.
The idea is that all the functions from NoxScript 3 should work exactly the same,
accept same arguments, etc. This way all existing functions can be copied with almost no changes (only syntax will vary).
To avoid confusion, we usually refer to vanilla scripts as “NoxScript 3”, while the new compatibility layer is called NS3.
If you have existing scripts you want to migrate, see our migration guide.
Otherwise, it’s better to start directly from the NS4, which is our current script version.
Подразделы NoxScript 3
Миграция с оригинала
Это руководство поможет перенести существующие NoxScript 3
карты на NS3 в OpenNox.
В этом руководстве мы будем называть оригинальные скрипты Nox как “NoxScript 3”, в то время как “NS3” будет обозначать новые
Go скипты для OpenNox.
Зачем?
Первый логичный вопрос: зачем? OpenNox хорошо работает с NoxScript 3 скриптами.
Есть пара причин перейти на скрипты OpenNox:
NoxScript 3 ограничен ровно тем что оригинальный Nox движек открывает. Возможностей не много. И никаких обновлений не будет.
NS3 в OpenNox является прямой заменой. Абсолютно те же функции доступны в нем.
Мы предоставляем инструмены для перевода 90% кода скрипта автоматически. Только мелкие правки необходимы.
NS4 (и далее) будут иметь всё больше и больше возможностей в будущем, включая поддержку модов.
Не нужен отдельный компилятор скриптов. Скрипты запускаются напрямую из кода.
Более полная система типов: настоящие массивы, словари (map), стркутуры, классы.
Доступны библиотеки: работа со строками, полная поддержка UTF8, математика, сортировка, и т.д.
Лучшая производительность: все библиотеки скомпилированы в OpenNox и запускаются нативно.
Лучшая отладка: если скрипт “падает”, выведется трасировка. Скрипты так же могут самостоятельно справиться с ошибкой!
Язык Go используемый в скриптах так же используется в самом OpenNox. Возможно однажды будет желание присоединиться?
Было бы несправедливо не упоминуть про недостатки:
Скрипты работают только в OpenNox.
Нужно изучить новый язык для скриптов.
Скриптам возможно необходимо делать больше для правильного сохранения/загрузки.
Если вы знакомы с EUD компилятором от Panic и возможно рассматривали его, см это руководство.
In general, we believe that OpenNox is the future of Nox modding, thus porting your map may give it an entirely new life!
How?
There are two path currently: converting the compiled script from the map or converting the source.
Converting the map script
You’ll need a recent noxtools installed (assuming you have Go 1.20+ installed):
go install github.com/noxworld-dev/opennox-lib/cmd/noxtools@latest
From the map directory:
noxscript ns decomp <mapname>.map
It will print a decompiled source code converted to Go and NS3 runtime.
Because of the limitation of Nox script assembly:
All variable names will be lost.
Some control flow may be replaced with goto.
But after fixing these issues, you should be ready to go!
Converting the source
TODO: Add a guide for using cxgo to automate it.
Currently, you’ll have to manually convert the source.
Until we automate it as well, please consider converting the extracted map script, as shown above.
NoxScript 3 is similar to C, which has a lot in common with Go.
However, Go syntax is slightly different in regard to types.
Conversion steps will include:
Swapping argument and variable names with types: int a -> a int.
Adding either var or const to variable definitions: int a -> var a int.
Moving function return type to the end: int foo() -> func foo() int.
Moving { to the previous line. E.g. func foo()\n{ -> func foo() {. Same for if, else, for.
Adding { ... } to if and else which do not have them: if (1) foo() -> if (1) { foo() }.
Removing void from returns.
Fixing variable types (Go doesn’t allow implicit type conversion).
After this, add the following header to your file:
Dot import should automatically resolve all references to NS3 functions.
After conversion
Limitations
There are some temporary limitations you should be aware of:
Timers will stop each time the map is reloaded. You’ll need to restart them from the script.
All callbacks will reset when map is reloaded. You’ll need to set them again from the script.
These issues will be resolved eventually.
New: Syntax
We highly recommend checking our Go tour to get familiar with the syntax, but we’ll give a short recap here.
File structure
All files must start with package <mapname>:
packageexample
It can be followed by one or more package imports:
import"fmt"import"strconv"// it is typical to group them:
import("fmt""strconv")
Then global variables and/or functions follow. Order of declarations doesn’t matter.
Variables and types
Most notable syntax distinction: in Go, the type name is on the right side, instead of on the left as in NoxScript 3:
varxint
intx;
Note that ; is no longer needed, and variable declaration must start with var (or const).
There’s a very good reason why types are on the right: it makes reading complex types more natural.
Just read them left to right!
For example, array: var x [3][2]int simply reads left to right as “array of 3 elements, each containing 2 int values”.
Much better than a random order of int x[2][3];.
Same for pointers: *[2]int reads “pointer to an array of 2 ints”. Compare it to int* x[2];.
Functions
Function declarations are also different:
They must start with func.
Types for arguments are on the right.
Return type is after the arguments.
Void return type must be omitted.
The opening {must be on the same line as the function header.
Arguments with the same types can be grouped.
Multiple returns are supported.
funcfoo(aint){}funcbar(x,yint,sstring)int{}
voidfoo(inta){}intbar(intx,inty,strings){}
Control flow
All control flow structures require the opening { to be on the same line, for example:
if(x){foo()}if(y){bar()}
if(x)foo();if(y){bar();}
The () in the condition is also optional:
ifx{foo()}ify{bar()}
if(x)foo();if(y){bar();}
Same rules for { apply for else:
ifx{foo()}else{bar()}
if(x)foo()elsebar()
Loops
Loops must not include ( and have same rules in regard to {:
variintfori=0;i<10;i++{}
inti;for(i=0;i<10;i++){}
Loop that use whilemust use for keyword:
forx{}
while(x){}
New: Core types
In original NoxScript 3, there were only a few types available: int, float, string, object.
In NS3 the list is much longer: bool, int, uint, float32 (analog of float), string, any, etc.
The object type is replaced with more specific types from NS3 package:
ObjectID,
ObjectGroupID,
WaypointID, etc.
An important distinction is that Go doesn’t allow implicit type conversion.
For example, in NoxScript it was okay to have an int variable and put an object there.
In NS3, this is requires an explicit type conversion: int(x). But, of course, it’s better to have correct types for your variables.
Another distinction of NS3 is the support of direct conversions between int and float.
It is done the same way: int(x) or float32(x).
Converting between int and string is supported via IntToString,
but it’s better to use Go’s standard library instead: strconv.Itoa.
It also supports conversion from string to int via Go’s standard library: strconv.Atoi.
Note, that this function may return an error, which you are free to ignore (with _):
x,_:=strconv.Atoi("1")
New: Strings
NoxScript 3 had a limitation that a frequent + operation on strings overflows a string table.
There’s no such limitation in NS3: any number of strings can be created.
Printing to strings is also supported with Go’s fmt.Sprintf:
Even though strings can be created with + and individual bytes can be accessed with s[i],
strings are immutable in Go! This means, once created, they cannot be edited, only new ones can be created.
If you need to change a few characters, consider converting to byte array, making changes, and converting back:
In NoxScript 3, only fixed arrays are supported. NS3 has support for Go slices, which are arrays with dynamic length:
vararr[]intfori:=0;i<3;i++{arr=append(arr,i+1)// adds elements to the end
}// len(arr) == 3
inti;intarr[3];for(i=0;i<3;i++){arr[i]=i+1;}
New: Structures
NS3 completely supports custom struct types. They are very similar to classes in other programming languages.
Let’s say we want to build an RPG map, and we want to record a new character class for all player units:
typeMyUnitstruct{IDns.ObjectID// types on the right: field "ID" with type "ns.ObjectID"
Classstring}funcinit(){unit:=ns.Object("Bob")// creates a new struct instance, takes pointer to it
myUnit:=&MyUnit{ID:unit,Class:"archer"}changeClass(myUnit,"shaman")}// changeClass accepts a pointer to struct be able to change fields.
// Removing the pointer will make a copy of the struct for this function!
funcchangeClass(unit*MyUnit,clstring){unit.Class=cl}
The changeClass function can also be rewritten as a method on MyUnit struct:
typeMyUnitstruct{IDns.ObjectID// types on the right: field "ID" with type "ns.ObjectID"
Classstring}// changeClass is a method on MyUnit struct pointer.
// Removing the pointer will make a copy of the struct for this function!
func(u*MyUnit)changeClass(clstring){u.Class=cl}funcinit(){unit:=ns.Object("Bob")myUnit:=&MyUnit{ID:unit,Class:"archer"}// now changeClass is available as a method on the struct instance
myUnit.changeClass("shaman")}
For developer coming from C, new structs always have their fields initialized to zero vales.
New: Dictionaries (maps)
NS3 support dictionaries/sets, which are unordered collections of values indexed by a key of any type.
For example, we made a MyUnit struct in the previous example. But how to quickly find MyUnit for ns.ObjectID?
typeMyUnitstruct{IDns.ObjectID// types on the right: field "ID" with type "ns.ObjectID"
Classstring}// mapUnits maps ns.ObjectID to *MyUnit.
// All maps must be created with make before use!
varmapUnits=make(map[ns.ObjectID]*MyUnit)funcinit(){createMyUnits()findAndChangeClass()}funccreateMyUnits(){unit:=ns.Object("Bob")myUnit:=&MyUnit{ID:unit,Class:"archer"}// add new record to the map, index by ID
mapUnits[unit]=myUnit}funcfindAndChangeClass(){unit:=ns.Object("Bob")// find by ID
myUnit:=mapUnits[unit]ifunit==nil{return// not found
}myUnit.Class="shaman"}
Keys can also be deleted from the map:
delete(mapUnits,unit)// delete by unit ID
EUD от Panic'а
History
Vanilla Nox has its own script runtime based on compiled source files. Since original Nox editor was never released,
community recreated the script compiler from scratch.
Since there’s no official version, the scripts had different dialects, one of the latest is known as NoxScript 3.
However, the script runtime of Nox was very limited. Eventually the community found a way to inject custom code into the
game, which lead to a new kind of map scripts, usually referred as “memhacks”.
Panic’s EUD is the most advanced project of this kind.
It uses memory manipulation to implement a lot of new functionality for the scripts.
Unfortunately, memory manipulation usually targets a single binary version (vanilla Nox), and thus cannot run on
other versions such as OpenNox. Because of this OpenNox does not support EUD scripts.
New runtime
Even though OpenNox cannot support scripts that use memory manipulation, we still can provide similar functions
in out own script runtime. Thus, OpenNox provides a compatibility layer for EUD scripts.
The idea is that all the functions from Panic’s EUD which do not
expose the memory directly should work exactly the same, in OpenNox
This way all existing functions can be copied with almost no changes (only syntax will vary).
If you have existing scripts you want to migrate, see our migration guide.
Otherwise, it’s better to start directly from the NS4, which is our current script version.
Подразделы EUD от Panic'а
Миграция с EUD
This guide will help migrate existing Panic’s EUD
maps to NS3 and
EUD layer in OpenNox.
First, it’s important to understand that “memhacks” and direct memory access is technically not possible in OpenNox.
Here are a few reasons why:
Memhacks target a specific binary. This means it only works on one Nox version.
OpenNox constantly evolves, thus we cannot guarantee any specific memory layout.
Memhacks usually inject assembly code that targets a specific CPU architecture (Intel/AMD x86).
OpenNox can be potentially compiled for ARM (e.g. MacBooks, Android, RPi), thus script will stop working there.
We attempted to resolve these issues with EUD developer Panic, but we don’t see any willingness for collaboration
from his side. If you really want EUD to be supported directly in OpenNox, please reach out to Panic.
Resolving these technical challenges is possible, but requires tight collaboration, and will to do so from him, first and foremost.
Why?
First logical question: why bother with converting to OpenNox? EUD works great in original Nox.
A few reasons to migrate to OpenNox scripts:
OpenNox is evolving and supports new features that are impossible in vanilla (e.g. HD, better multiplayer, modding, etc).
EUD library in OpenNox is a drop-in replacement. Same functions will be supported.
NS4 (and beyond) will have even more features going forward.
You won’t need a separate script compiler. Scripts are run directly from source.
More comprehensive type system: proper arrays, dictionaries (map), structures, classes.
A lot more libraries included: string manipulation, full UTF8 support, math, sorting, etc.
Better performance: all libraries are compiled into OpenNox and run natively.
Better debugging: if script crashes, there’s a stack trace. Scripts can recover from it as well!
Go language used in scripts is used in OpenNox itself. Maybe one day you’ll decide to contribute?
In general, we believe that OpenNox is the future of Nox modding, thus porting your map may give it an entirely new life!
How?
At this point, we are still working on improving the EUD
compatibility layer, so quite a few functions might still be unavailable. Please talk to us for more details.
In general the conversion process is very similar to the one for converting NS3 source manually.
Same changes must be done to the source to align the syntax. We are working on a more automated process.
You need to be aware that all functions using GetMemory and SetMemory must be rewritten in any case.
The first thing to do is to check if functions you are using are already available in Panic’s EUD library.
If so, updating your EUD script to using these function will help you convert to our EUD
library later as well.
We aim to provide a good migration path for well-known EUD libraries, so if you copied code from another EUD project,
there’s a high chance we support it in one of the libraries.
Still, if you cannot find anything similar, talk to us. We will help convert your code and include necessary functionality
into next OpenNox release.
After conversion
The NS3 guide applies here as well, so make sure to check it out!