OpenNox
Information about the OpenNox engine.
Information about the OpenNox engine.
This page shows what’s new in the latest OpenNox release.
Bug A well-known issue affecting specific version.
Breaking A change that requires action by you after upgrading.
Change A change in default behavior that may requires action by you if you want to revert it.
Experiment An experimental change that may be removed or changed completely in the future.
New Marks new behavior you might find interesting or comes configurable.
Fix A fix of a bug or regression.
Known issues
New
ENERGY_BOLT and PLASMA.Fixes
GREEN_BOLT effect when called from a script.cheat spells all.cheat summon.nolimit.goto console command.bind command.cheat spawn command to spawn items and monsters.opennox.yml config.cheat health and cheat mana now work properly without arguments.cheat sage command that gives all spells and scrolls, but doesn’t make you invincible.cheat spells command that only gives all spells for your class.cheat scrolls command that only gives all best scrolls.cheat god (as opposed to set god) that only makes you invincible, but won’t give any spells.cheat gold.opennox.yml config with all extended options.opennox.yml config.New
opennox-hd.exe for it.cheat charm.all to charm any creature (including humanoids).Fixes
-soft flag.user.rul file permissions.set allow.all was renamed to cheat equip.allset mana was renamed to cheat manaset health was renamed to cheat healthset mana.set allow.all enabled.allow.all.cheat gold, so it’s accepted in Quest games.set health and set mana cheats.set allow.all cheat to remove item class restrictions.gamedata.bin values without encoding it. See gamedata-sample.yml..txt, .rul, .lua, .png).All vanilla features are supported. You should be able to complete the campaign and play online with OpenNox.
If something doesn’t work, please file an issue.
OpenNox will work out-of-the-box on any recent Windows version. This includes proper graphics and online multiplayer.
OpenNox also works natively on Linux, including Steam Deck.
OpenNox doesn’t provide Nox assets. You must own a copy of the original game and have it installed in order to run it. OpenNox will attempt to find Nox installation automatically.
OpenNox is able to connect to vanilla Nox servers, as well as vanilla Nox clients are able to connect to OpenNox servers. This is only true for regular version of OpenNox. OpenNox HD will refuse to connect with non-HD (legacy) players.
OpenNox can load vanilla Nox content and should work on any recent Windows and Linux versions with no graphical issues.
Additionally, OpenNox provides an HD version, which allows using display resolutions up to 4K. OpenNox HD will refuse connections from non-HD/legacy version and from vanilla Nox, because fairness considerations.
OpenNox supports custom TTF and OTF fonts to replace vanilla raster fonts.
Vanilla Nox distinguishes between online and LAN multiplayer. It uses XWIS server and requires login/password for it.
OpenNox combines both online and LAN games into a single list. It doesn’t require XWIS password, while still able to join XWIS servers.
OpenNox also attempts to automatically forward ports, when hosting a game online. This requires UPnP to be enabled on your router (which is enabled by default in most cases).
There is an initial work done for supporting playing solo campaign in multiplayer.
OpenNox provides a headless dedicated server both for Linux and Windows.
OpenNox servers expose a simple HTTP API for getting server information, which allows easy integration with websites, Discord bots, etc. The same API provides a simple Web control panel for the server.
OpenNox improves a few aspects of the game to make it more convenient to players, or to provide more options.
Apart from a simpler online games list, automatic port-forwarding and more graphical options, OpenNox additionally provides:
OpenNox aims to greatly improve modding support. It is still a work-in-progress, but there are a few improvements already implemented:
Appimage is a portable packaging format designed to simplify user interaction with software by removing the need to install it as a package or install its dependencies.
32 bit Appimage packages are provided since v1.8.12-alpha9 (25 Aug 2023).
The Appimage contains all 3 executables: non-hd client, hd client and dedicated server.
The Appimage release is not portable by default – it overrides config location and data location to use user’s home folder conforming to Freedesktop standard “XDG Base Directory Specification v0.8”. This is done specifically to allow making packages out of this AppImage and to allow direct system installation (in /usr/local/bin for example).
Please note, that $HOME is either user’s home or a portable home, depending on how you install OpenNox.
$HOME/.local/share/opennox$HOME/.config/opennox$HOME/.local/state/opennoxOpenNox is not a full game. It requires game content files of the original Nox installation!
See GoG for purchase options. Original CD should work as well.
Most probably, you are using 64 bit distribution of Linux. To use OpenNox you have to enable i386 architecture and install these packages:
Make sure you have 32 bit version of your graphics drivers installed to provide libgl1:i386.
On 32 bit distributions you probably have everything installed already.
$HOME/.local/share/opennox folder. Alternatively, you can install Nox into this folder.opennox.yml into $HOME/.config/opennox folder.opennox-bundle-i386.AppImage, then portable home folder must be named opennox-bundle-i386.AppImage.home..local/share/opennox folder inside the portable home folder you had created in step 2..config/opennox folder inside the portable home folder you had created in step 2.Appimage release always checks the first parameter to decide which executable to run.
$HOME/.local/share/opennox folder.If nothing helps, please contact us on OpenNox Discord in #feedback channel and share the opennox.log located in the .local/state/opennox folder.
HD and legacy versions won’t join servers of the opposite version.
Most online servers still run legacy version, so if you want to join them, you must run legacy version of OpenNox as well.
This release is just OpenNox binaries packed into tar.gz archive.
OpenNox is not a full game. It requires game content files of the original Nox installation!
See GoG for purchase options. Original CD should work as well.
To run OpenNox you will need to install this dependencies:
Make sure you have 32 bit version of your graphics drivers installed to provide libgl1:i386.
opennox, opennox-hd and opennox-server as executable.opennox, opennox-hd and opennox-server as executable.$HOME/Nox folder. Alternatively, you can install Nox into this folder.You need to create launchers yourself for executables you want to run.
Please note, that working directory must be set to the Nox installation folder.
Navigate to the Nox installation folder, before running any of these commands.
opennoxTo run OpenNox HD, issue this command:
opennox-hdTo run OpenNox dedicated server, issue this command:
opennox-serverIf you placed binaries not Nox installation folder, you have to provide a full or relative path to the binary.
$HOME/Nox directory or in the place specified in opennox.yml (which can be either in $HOME/.config/opennox or in the working directory used to call binaries from):game:
data: /home/user/some/path/to/NoxChange this path manually to a folder where your copy of Nox is installed, if necessary. Restart OpenNox.
If nothing helps, please contact us on OpenNox Discord in #feedback channel and share the opennox.log located in the $HOME/snap/opennox/common/logs folder.
HD and legacy versions won’t join servers of the opposite version.
Most online servers still run legacy version, so if you want to join them, you must run legacy version of OpenNox as well.
Flatpak is a packaging format designed to simplify user interaction with software by removing the need to install its dependencies.
Flatpak package is provided since v1.8.12-dev (0a8352c) (13 Jan 2023).
Flatpak package supplies only 2 executables: non-hd client and hd client.
OpenNox is not a full game. It requires game content files of the original Nox installation!
See GoG for purchase options. Original CD should work as well.
You will need Flatpak installed.
$HOME/Nox folder. Alternatively, you can install Nox into this folder.After installing you should get two launchers in your applications menu: OpenNox and OpenNox HD. Run the one you need.
To run OpenNox Non-HD (legacy) issue this command:
flatpak run io.github.noxworld_dev.OpenNoxTo run OpenNox HD issue this command:
flatpak run --command=opennox-hd io.github.noxworld_dev.OpenNox$HOME/Nox or in the place specified in $HOME/opennox.yml:game:
data: /home/user/some/path/to/NoxChange this path manually to a folder where your copy of Nox is installed, if necessary. Restart OpenNox.
If nothing helps, please contact us on OpenNox Discord in #feedback channel and share the opennox.log located in the logs folder, which is located either in your home folder or in OpenNox working directory.
HD and legacy versions won’t join servers of the opposite version.
Most online servers still run legacy version, so if you want to join them, you must run legacy version of OpenNox as well.
Snap is a packaging format designed to simplify user interaction with software by removing the need to install its dependencies.
Snap package is provided since v1.8.6 (19 Dec 2021).
Snap package supplies all 3 executables: non-hd client, hd client and dedicated server.
OpenNox is not a full game. It requires game content files of the original Nox installation!
See GoG for purchase options. Original CD should work as well.
You will need snapd installed.
$HOME/Nox folder. Alternatively, you can install Nox into this folder.After installing you should get two launchers in your applications menu: OpenNox and OpenNox HD. Run the one you need.
To run OpenNox Non-HD (legacy), issue this command:
snap run opennoxTo run OpenNox HD, issue this command:
snap run opennox.hdTo run OpenNox dedicated server, issue this command:
snap run opennox.server$HOME/Nox or in the place specified in $HOME/opennox.yml:game:
data: /home/user/some/path/to/NoxChange this path manually to a folder where your copy of Nox is installed, if necessary. Restart OpenNox.
If nothing helps, please contact us on OpenNox Discord in #feedback channel and share the opennox.log located in the $HOME/snap/opennox/common/logs folder.
HD and legacy versions won’t join servers of the opposite version.
Most online servers still run legacy version, so if you want to join them, you must run legacy version of OpenNox as well.
OpenNox is not a full game. It requires game content files of the original Nox installation!
See GoG for purchase options. Original CD should work as well.
.exe file for Windows.opennox-hd.exe.HD version will not join public legacy servers!
This is done for fairness reasons, since not everyone runs OpenNox in HD. You can still host your own server for your friends to join.
opennox.exe.Legacy version will not join HD servers.
Make sure to run the same version as the server when playing online.
First, try running OpenNox with Administrator permissions. If it works, then your Nox copy is likely installed in the protected folder like “Program Files” which causes issues. Delete OpenNox folder, reinstall Nox to some other folder and install OpenNox again.
If it doesn’t help, open opennox.yml in OpenNox installation directory in a text editor (Notepad++ is a good option).
Find section similar to this:
game:
data: C:\Games\NoxChange the path manually to a folder where your copy of Nox is installed. Restart OpenNox.
If it still doesn’t work, please contact us on OpenNox Discord in #feedback channel.
It will help if you share opennox.log located in log folder in OpenNox install directory.
As was explained in the installation section, HD and legacy versions won’t join servers of the opposite version.
Most online servers still run legacy version, so if you want to join them, you must run legacy version of OpenNox as well. Make sure to try a correct version when joining a server.
This guide is based on Linux installation guide.
Specific Steam Deck guide will be provided in the future as well.
OpenNox is not a standalone game. It requires a copy of original Nox installed!
See GoG for purchase options.
Installation should create a “OpenNox HD” shortcut in the start menu. Alternatively: run opennox-hd binary from terminal.
HD version will not join public legacy servers!
This is done for fairness reasons, since not everyone runs OpenNox in HD. You can still host your own server for your friends to join.
Installation should create a “OpenNox” shortcut in the start menu. Alternatively: run opennox binary from terminal.
Legacy version will not join HD servers.
Make sure to run the same version as the server when playing online.
Try starting opennox from the terminal. Check if there are any error messages there.
If it doesn’t help, open opennox.yml in OpenNox installation directory in a text editor. Find section similar to this:
game:
  data: /home/user/some/path/to/Nox
Change the path manually to a folder where your copy of Nox is installed. Restart OpenNox.
If it still doesn’t work, please ping us on OpenNox Discord in #feedback channel.
It will help if you share opennox.log located in log folder in OpenNox install directory.
As was explained in the installation section, HD and legacy versions won’t join servers of the opposite version.
Most online servers still run legacy version, so if you want to join them, you must run legacy version of OpenNox as well. Make sure to try a correct version when joining a server.
This section contains additional information about game features unique to OpenNox.
OpenNox provides more commands for Nox Quest game mode.
Originally, Nox Quest:
To solve all of this, you can run (in the game console; F1):
racoiaws
set quest warp.allow
set quest warp.inc 10
set quest warp.inf
For more detailed description of commands, read on.
This option disables the requirement to complete a certain Quest level before accessing the portal.
Example:
# always allow to pass through the portal
set quest warp.allow
set quest warp.allow 1

# original Nox behavior
set quest warp.allow 0Changes the number of levels that the portal skips at a time.
Example:
# portal will only skip one level instead of 5
set quest warp.inc 1
# skip 20 levels
set quest warp.inc 20

# original Nox behavior
set quest warp.allow 5Allows the portal to work indefinitely instead of shutting down at level 20.
Example:
# portal will always be enabled
set quest warp.inf
set quest warp.inf 1

# original Nox behavior
set quest warp.inf 0Changes the number of levels that will be skipped on the stage completion. In other words, how quickly the levels will increase when you complete a Quest level.
This allows to ramp up difficulty much faster without affecting other Quest rules.
Example:
# completing level 5 will lead to level 7 (+2) instead of 6 (+1)
set quest level.inc 2

# original Nox behavior
set quest level.inc 1This mode is highly experimental! You will encounter bugs.
You must restart the game after playing in this mode. Otherwise, game session and the menu will likely be broken.
racoiaws (enables console commands).set maps allow.all.load wiz01a (for Wizard), load con01a (for Conjurer), load war01a (for Warrior).load to jump to other chapters.tp (or tp 0).tpto (or tpto 0).unstuck.Use SSH remote console to copy-paste commands.
Surprisingly, vanilla Nox has a hidden feature that allows casting spells manually by pressing one of 9 phoneme/gesture keys in the right order to cast specific spells. It is similar to the way spell casting works in Magicka.
OpenNox restores this feature by default. Manually casting each spell is challenging, thus we think that it doesn’t give any advantage in multiplayer (actually the opposite), so can be enabled safely.
All that needs to be done to use it to set hotkeys in OpenNox input options. There are 8 main phonemes, plus a special “end” phoneme to finish and cast the spell.
It’s typical to use numpad keys for phonemes where 5 or Enter is an “end” phoneme, and actual phonemes occupy other number keys:
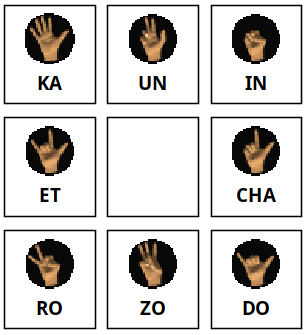
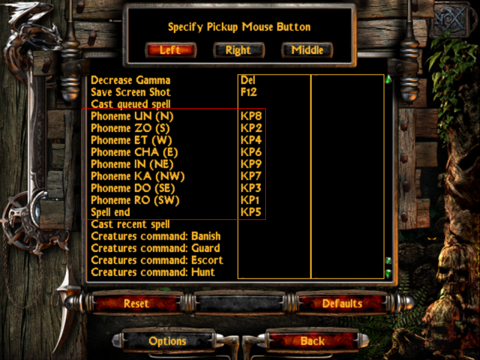
Another typical layout is to use QWER-ASDF block for 8 phonemes and set “end” to any key that is close enough.
For more details, see this post.
OpenNox provides an easier way to host Nox game servers.
The simplest way to host a game is by using OpenNox game client.
Run OpenNox or OpenNox HD, go to the “Network” page, and host the game. Simple as that!
OpenNox will automatically register the game online (for both OpenNox and Nox Reloaded).
It will also attempt to automatically forward ports for the server (using UPnP on your router).
Servers hosted with OpenNox HD version will not allow non-HD clients!
This is done for fairness reasons. Since not everyone runs OpenNox in HD, it will significantly limit their vision distance, giving a big advantage to HD players.
There are quite a few bug reports about dedicated server freezing.
Thus, it is not recommend to run dedicated server at this stage.
OpenNox also ships with the opennox-server binary, which can be used to run a dedicated server.
Also, Docker images are available for the server.
When hosting a dedicated server, it is important to setup access by remote console and/or HTTP API to control the server remotely.
Vanilla Nox supported a telnet-based remote console (RCON) which allowed controlling Nox server remotely.
OpenNox has dropped telnet support in favor of SSH-based remote console.
OpenNox only emulates SSH protocol. It does not allow accessing the host machine via SSH.
To enable RCON, OpenNox must be started with an additional argument:
opennox --rcon=:18522 --rcon-pass=my-secret-passwordThis will allow SSH connections on port 18522 with a password my-secret-password:
ssh -p 18522 127.0.0.1See this tutorial
ssh -p 18522 127.0.0.1Or install PuTTY and connect to 127.0.0.1:18522 with any username and password my-secret-password.
  /888888                                /88   /88           /88   /88
 /88__  88                              | 888 | 88          | 88  / 88
| 88  \ 88  /888888   /888888  /8888888 | 8888| 88  /888888 |  88/ 88/
| 88  | 88 /88__  88 /88__  88| 88__  88| 88 88 88 /88__  88 \  8888/
| 88  | 88| 88  \ 88| 88888888| 88  \ 88| 88  8888| 88  \ 88  >88  88
| 88  | 88| 88  | 88| 88_____/| 88  | 88| 88\  888| 88  | 88 /88/\  88
|  888888/| 8888888/|  8888888| 88  | 88| 88 \  88|  888888/| 88  \ 88
 \______/ | 88____/  \_______/|__/  |__/|__/  \__/ \______/ |__/  |__/
          | 88
          | 88        Version: v1.9.x (xxxxxxxxx)
          |__/

user@opennox:~$
From here, all console commands will work the same way as via in-game console.
A good starting point is a help command.
GET /api/v0/game/infoExample request using curl:
curl 'http://127.0.0.1:18580/api/v0/game/info'Example response:
{
  "name":"OpenNox",
  "map":"estate",
  "mode":"arena",
  "vers":"v1.8.0",
  "players":{
    "cur":1,
    "max":32,
    "list":[
      {
        "name":"Jack",
        "class":"wizard"
      }
    ]
  }
}You need to run the server with NOX_API_TOKEN=<some-random-string> to allow using control APIs.
You must set token to something complex. Otherwise, someone can get full control of your server!
All examples below assume NOX_API_TOKEN=xyz.
POST /api/v0/game/map
X-Token: xyz

estate
Example request using curl:
curl -X POST -H 'X-Token: xyz' -d 'estate' 'http://127.0.0.1:18580/api/v0/game/map'POST /api/v0/game/cmd
X-Token: xyz
load estateExample request using curl:
curl -X POST -H 'X-Token: xyz' -d 'load estate' 'http://127.0.0.1:18580/api/v0/game/cmd'POST /api/v0/game/eval
X-Token: xyz
ns4.CreateObject("RedApple", ns4.GetHost().Unit().Pos())Example request using curl:
curl -X POST -H 'X-Token: xyz' -d 'ns4.CreateObject("RedApple", ns4.GetHost().Unit().Pos())' 'http://127.0.0.1:18580/api/v0/game/eval'POST /api/v0/game/lua
X-Token: xyz
p = Nox.Players[1];
apple = Nox.ObjectType("RedApple");
apple:Create(p);Example request using curl:
curl -X POST -H 'X-Token: xyz' -d 'p = Nox.Players[1]; apple = Nox.ObjectType("RedApple"); apple:Create(p)' 'http://127.0.0.1:18580/api/v0/game/lua'OpenNox provides a lot of tooling for modding the game. Some of it is still in development.
Vanilla Nox stores game balance values in an encoded gamedata.bin file.
OpenNox allows overriding values specified in that file with the ones written in a text-based gamedata.yml file.
To try it out, copy gamedata.yml to the Nox game directory (not OpenNox directory!). After this, you can edit it using any text editor (Notepad++ is recommended for Windows users).
Vanilla Nox stores spell configs in three different places:
thing.bin fileThe engine defines a list of all supported spell IDs (e.g. SPELL_BLINK) and the effect associated with it.
The thing.bin then lists spells that should be enabled in the game (by ID) and additionally configures them.
Unfortunately, this configuration is quite limited.
The balance file may additionally tune per-level spell parameters, or special parameters that are unique to certain spells.
OpenNox extends this system and allows using spells.yml file to configure new spell parameters, as well as old ones in one place.
Note: this modding feature is still in development. Not all the config options for spells are available in spells.yml.
We will keep adding new ones in each version of OpenNox.
spells.yml fileSince this feature is in the development, it is strongly advised to generate a fresh spells.yml based on the latest
OpenNox version and your Nox game data.
This can be done by running OpenNox with NOX_DUMP_SPELLS=true environment variable.
On Linux:
NOX_DUMP_SPELLS=true opennoxOn Windows (via cmd.exe):
set NOX_DUMP_SPELLS="true"
opennox.exe
This should create a spells.yml in Nox game data directory (not OpenNox directory!).
Alternatively, you could copy the spells.yml file to your Nox game directory. Be aware that the sample file might be old and won’t list all options available in the engine.
spells.ymlNote that modifying spells.yml currently requires OpenNox restart.
Usually, the spell section will look like this:
name: SPELL_BLINK
icon:
  ind: 131860
icon_enabled:
  ind: 131938
mana_cost: 10
price: 3000
flags:
- 1
- MOBS_CAN_CAST
- 128
- 1024
- CAN_COUNTER
- CANT_HOLD_CROWN
- 1048576
- CLASS_ANY
- 2147483648
phonemes: [cha, et, un]
title: thing.db:Blink
desc: thing.db:SPELL_BLINK_DESC
cast_sound: BlinkCast
---
Where:
name - specifies spell ID to use; if effect is not set, this also determines the spell effecteffect - specifies spell ID which will control the actual effect of the spell; see adding spellsicon.ind - the sprite index from video.bag that is used as a spell iconicon_enabled.ind - same as icon.ind, but for enabled spell iconmana_cost - mana cost of the spellprice - base spell book price; Quest uses an additional multiplier for this priceflags - different flags that controls which category spell belongs to, what it can target, etcphonemes - a unique list of spell phonemes/gestures that invoke this spell; see spell castingtitle - a string ID for the spell titledesc - a string ID for the spell descriptioncast_sound - a sound for casing a spellon_sound - a sound for enabling a spelloff_sound - a sound for disabling a spellThese are the only parameters that can be originally controlled via thing.bin, and was ported to spells.yml.
Apart from these, OpenNox provides more options for certain spells.
For example, SPELL_MAGIC_MISSILE has a new section:
missiles:
  spread: 16
  projectile: MagicMissile
  vel_mult: 0.1
  offset: 4
  speed_rnd_min: 0.80000001
  speed_rnd_max: 1.2
  search_dist: 600
Here, a count parameter is omitted, because it is usually controlled via balance file (see MagicMissileCount).
Specifying it here will override balance data.
When a special section like missiles this is present, all parameters in there can be controlled individually for each spell level:
missiles:
  # default parameters for all levels
  spread: 16
  projectile: MagicMissile
  vel_mult: 0.1
  offset: 4
  speed_rnd_min: 0.80000001
  speed_rnd_max: 1.2
  search_dist: 600
  # per-level configs
  levels:
    # levels 1-3: copied from balance file
    - count: 1
    - count: 2
    - count: 3
    # level 4: same number of missiles as lvl3, but longer homing distance
    - count: 3
      search_dist: 800
    # level 5: make it ultimate: more missiles, longer distance, faster missiles
    - count: 10
      speed_rnd_min: 1.0
      speed_rnd_max: 2.0
search_dist: 800Not all flags are completely understood at this point. So we recommend to see what flags are set for existing spells and experiment by setting/unsetting them in your mod.
Names of the spell flags provided below may change in a freshly-generated spells.yml,
but OpenNox will still support old names as well.
Player class flags:
CLASS_ANY - spell can be used by any magic class (Conjurer and Wizard)CLASS_WIZARD - spell can only be used by WizardCLASS_CONJURER - spell can only be used by ConjurerTargeting flags
TARGETED - spell is homingAT_LOCATION - spell can be cast at a pointCANT_TARGET_SELF - spell cannot be targeted at the characterCast flags:
NO_MANA - spell doesn’t require manaNO_TRAP - spell can’t be used in trapsINSTANT - spell is instantDURATION - spell is duration-basedOFFENSIVE - spell is offensiveDEFENSIVE - spell is defensiveCAN_COUNTER - spell can be counteredMOBS_CAN_CAST - mobs are allowed to use this spellCANT_HOLD_CROWN - spell can’t be cast when holding a flag/crown/ballSpecial flags
SUMMON_SPELL - this is the base Summon Creature spellSUMMON_CREATURE - this is Summon for a specific creatureMARK_SPELL - this is the base Mark Location spellMARK_NUMBER - this is Mark Location with a specific numberGOTO_MARK_SPELL - this is the base Go To Mark spellGOTO_MARK_NUMBER - this is Go To Mark with a specific numberThere are some flags that don’t have names, which means we are not sure of its effect.
Currently, adding new spells in OpenNox is not supported.
Having said that it is possible to replace unused spell slots that already exist in the game.
In spell section there’s a name parameter that defines the slot that the spell uses
and effect for the engine to know which effect to run.
Usually these two IDs are the same (or effect is empty and derived from name), but these fields can be used to replace
unused spell IDs with custom ones.
For example, there’s SPELL_PHANTOM which doesn’t appear in the game and has no effect in the engine.
This gives us a free spell slot to use. Let’s replace it with a custom magic missiles (SPELL_MAGIC_MISSILE) variant.
For this we need to set name: SPELL_PHANTOM (or find existing section with it) to specify which slot we are using,
and set effect: SPELL_MAGIC_MISSILE for the engine to know which logic to use for it. The result should look like this:
name: SPELL_PHANTOM # replacing Phantom spell slot
effect: SPELL_MAGIC_MISSILE # but effect is based on Magic Missiles
phonemes: [un, ro, do] # phonemes must be unique, so we keep ones from Phantom
# the rest is copied from Missiles and modified
icon:
  ind: 18248
icon_enabled:
  ind: 131967
mana_cost: 50
price: 5000
flags:
  - AT_LOCATION
  - MOBS_CAN_CAST
  - OFFENSIVE
  - CAN_COUNTER
  - CANT_TARGET_SELF
  - CLASS_WIZARD
  - 536870912
  - 1073741824
title: thing.db:MissilesOfMagic
desc: thing.db:SPELL_MAGIC_MISSILE_DESC
cast_sound: MagicMissileCast
missiles:
  count: 5
  spread: 30
  projectile: MagicMissile
  vel_mult: 0.1
  offset: 4
  speed_rnd_min: 0.1
  speed_rnd_max: 0.3
  search_dist: 800
---The main build supports a way to replace sprites used by the game.
For it to work, you may first need to get original sprites:
cd Nox
noxtools videobag extract -z --out ./video.bag.zip
Find sprites that you want to replace and put them into Nox/images (create if not exists).
Make the changes to the sprite in this directory and run the game to test it.
Note that it will ONLY work with this Nox version. Original Nox, GoG version or Nox Reloaded doesn’t support this.
If you decide to change the sprite significantly, e.g. changing its size or completely redrawing the image, you may need to change the sprite offset used by the engine.
First, get the original sprite metadata:
cd Nox
noxtools videobag extract -z --out ./video.bag.zip --json
Now this archive will contain .json files that correspond to each sprite. Copy selected ones to Nox/images,
adjust the offsets using the text editor and check them in game.
Most of the text used in Nox is stored in the CSF files which are encoded and are hard to modify.
This build provides an easier way to customize those texts.
First, decode the original file:
noxtools strings csf2json nox.csfThis will produce nox.csf.json file that you can modify with a regular text editor.
The build will automatically use this file instead of the original nox.csf.
The nox.csf.json file will consist of sections similar to this:
    {
      "id": "ParseCmd.c:exithelp",
      "vals": [
        {
          "str": "Exit the game to Main Menu."
        }
      ]
    }
For translation Nox texts to a different language (or changing existing texts),
you need to keep the id field, but translate all str fields.
For adding custom strings, you need to add a new section with a unique id add at least one str.
Then you should be able to use this new id in your map or mod.
OpenNox provides multiple scripting runtimes. Some of them are experimental or in development.
OpenNox implements a new more powerful version of NoxScript runtime.
It can be used to make new generation of maps, as well as some full-featured mods in the future.
See NoxScript quickstart if you want to try it.
OpenNox implements an experimental LUA map script runtime.
LUA scripts are deprecated. Consider using new NoxScript runtime.
To create a LUA map script, put <mapname>.lua file in the map’s directory.
For example:
maps/
  estate/
    estate.map
    estate.nxz
    estate.lua
You also need to request a specific version of the scripting API that you want to use:
Nox = require("Nox.Map.Script.v0")Now you are ready to write some magic Nox scripts!
It is also possible to add more LUA files, for example:
maps/
  estate/
    estate.map
    estate.lua
    other_file.lua
And use require to load it:
other_file = require("other_file")You can access script variables for debugging using Nox console.
First, you should enable cheats (racoiaws), and the prefix all you commands with lua .
For example:
lua p = Nox.Players.host
lua print(p)
Timers allow to trigger some LUA function at a later time.
This timer will call a given function after N game frames (server ticks).
function MyFunc()
    print("trigger!")
end
Nox.FrameTimer(60, MyFunc)This timer will call a given function after N in-game seconds pass.
function MyFunc()
    print("trigger!")
end
Nox.SecondTimer(10, MyFunc)
Walls in Nox are positioned on a regular grid. Thus, walls can be addressed by those grid positions. If walls are marked as scriptable in the editor, it will be possible to enable (close) and disable (open) them.
Wall(xi,yi) - get a wall by its grid coordinates.WallAt(x,y) - get a wall at exact real coordinates (not grid ones).WallNear(x,y) - get a wall near specific real coordinates (not grid ones).WallNear(obj) - get a wall near a specific object or waypoint.WallGroup(id) - finds a wall group by the ID.This object represents a single wall on the map.
w.xi - returns X grid coordinate of the wall.w.yi - returns Y grid coordinate of the wall.w.x - returns real X coordinate of the wall.w.y - returns real Y coordinate of the wall.w.enabled - checks if the wall is enabled (closed) or sets the enabled state.w:Pos() - returns wall’s real position as a pair of X,Y coordinates.w:Toggle() - toggles the wall’s state (opened/closed).w:Break() - break this wall (must be set as breakable).This object represents a group of one or more walls on the map.
w.id - returns ID of this wall group.w:Toggle() - toggles walls state (opened/closed).w:Break() - break these walls (must be set as breakable).Open secret wall near the player (must be really close):
local p = Nox.Players.host
Nox.WallNear(p).enabled = false
Break a wall group with ID MyGroup on the map:
local g = Nox.WallGroup("MyGroup")
g:Break()This section describes player-related objects and functions.
Players list can be accessed via Nox.Players meta-class.
Players() - returns current list of players as LUA array.Players[i] - returns a player by index i.Players:Print(text) - prints a text message to all players.Players:Blind() - blinds all players (fades the screen to black).Players:Blind(false) - unblinds all players (fade back to normal).Player object includes information about human-controlled player, as well as a unit he controls.
p.name - returns player’s name.p.host - checks if player is a host.p.unit - returns player’s unit, if any.p.x - gets or sets player’s unit X coordinate.p.y - gets or sets player’s unit Y coordinate.p:Pos() - returns player’s unit position as a pair of X,Y coordinates.p:SetPos(x,y) - instantly moves player’s unit to given coordinates.p:SetPos(obj) - instantly moves player’s unit to a given object or waypoint.p:Print(text) - prints a text message to the player.p:Blind() - blinds player (fades the screen to black).p:Blind(false) - unblinds player (fade back to normal).Iterating over all players:
local players = Nox.Players()
for i,p in ipairs(players) do
    print(p)
end
Getting the first player:
local p = Nox.Players[1]
print(p)
Getting the host player:
local p = Nox.Players.host
print(p)
Getting player’s name:
local p = Nox.Players.host
print(p.name)
Checking if player is a host:
local p = Nox.Players[1]
if p.host then
    print("it's the host!")
end
Blind everyone:
Nox.Players:Blind()Blind everyone except the host:
local players = Nox.Players()
for i,p in ipairs(players) do
    if not p.host then
        p:Blind()
    end
endThis section describes different object present in game.
Object type describes a “prototype” of an object that can be spawned in-game.
Nox.ObjectType(id) - find an object type by ID.t.id - returns object type ID.t:Create(x,y) - creates a new object instance at given coordinates.t:Create(obj) - creates a new object instance at the position of another object or waypoint.Nox.Object(id) - find an object by ID.v.id - returns object’s ID, if any.v.owner - returns or sets object’s owner.v.x - gets or sets object’s X coordinate.v.y - gets or sets object’s Y coordinate.v.z - gets or sets object’s Z coordinate.v.enabled - checks if object is enabled or sets the enabled state.v:Pos() - returns object’s position as a pair of X,Y coordinates.v:SetPos(x,y) - instantly moves object to given coordinates.v:SetPos(obj) - instantly moves object to another object or waypoint.v:SetOwner(obj) - sets object owner; same as v.owner, but allow chaining.v:Delete() - permanently delete object from the map.v:Toggle() - toggles object’s enabled state.Unit extends the generic object, so everything that can be done with object can be done with a unit.
v.health - current health of the unit.v.max_health - max health of the unit.v.mana - current mana of the unit.v.max_mana - max mana of the unit.v:Freeze() - freezes the unit in place.v:Wander() - make the unit wander around.v:Return() - make the unit return to its starting position.v:Idle() - make the unit idle.v:Guard() - make the unit guard position.v:Hunt() - make the unit hunt for enemies.v:LookAt(x,y) - make the unit look at certain position.v:LookAt(obj) - make the unit look at another object or waypoint.v:LookAtDir(dir) - make the unit look in a given direction.v:LookAngle(dir) - make the unit look at a given angle.v:MoveTo(x,y) - make the unit move to certain position.v:MoveTo(obj) - make the unit move to another object or waypoint.v:WalkTo(x,y) - make the unit walk to certain position.v:WalkTo(obj) - make the unit walk to another object or waypoint.v:Follow(obj) - make the unit follow another object.v:Attack(obj) - make the unit attack another object.v:HitMelee(x,y) - make the unit hit melee a certain position.v:HitMelee(obj) - make the unit hit melee another object or waypoint.v:HitRanged(x,y) - make the unit hit ranged a certain position.v:HitRanged(obj) - make the unit hit ranged another object or waypoint.Teleport player 10 pixels right:
p = Nox.Players.host
x, y = p:Pos()
x = x + 10
p:SetPos(x,y)
Teleport player 1 to player 2:
p1 = Nox.Players[1]
p2 = Nox.Players[2]
p1:SetPos(p2)
Spawn 10 apples near the player:
apple = Nox.ObjectType("RedApple")
p = Nox.Players.host
for i = 1,10 do
    apple:Create(p)
end
Spawn Mimic near the player and make him friendly:
mimic = Nox.ObjectType("Mimic")
p = Nox.Players.host
mimic:Create(p):SetOwner(p)
Spawn 2 Beholders and make them follow the player:
beholder = Nox.ObjectType("Beholder")
p = Nox.Players.host
arr = {}
for i = 1,2 do
    arr[i] = beholder:Create(p)
end
squad = Nox.ObjectGroup(unpack(arr))
squad:SetOwner(p)
squad:Follow(p)
Make a train of 5 Bombers that follow each other and the player:
function trainFollow()
    p:Print("Bomber train!")
    prev = p
    for i, b in ipairs(bombers) do
        b:Follow(prev)
        prev = b
    end
end

function makeTrain()
    bomber = Nox.ObjectType("Bomber")
    p = Nox.Players.host
    bombers = {}
    for i = 1,5 do
        bombers[i] = bomber:Create(p)
    end
    train = Nox.ObjectGroup(unpack(bombers))
    train:SetOwner(p)
    -- give them a frame or two to appear
    Nox.FrameTimer(2, trainFollow)
end

makeTrain()Information about the OpenNox engine.
Just like in vanilla Nox, OpenNox starts with most console commands disabled. This is done to prevent cheating in the solo campaign. Most commands will not work in multiplayer, unless you are a server admin/host.
To enable all commands, open the console (F1 by default) and type:
racoiawsOpenNox does not support original RCON protocol based on telnet.
Instead, it implements remote console via built-in SSH server.
To get a list of all available commands, use help.
Here’s the list of the most interesting ones.
Take a screenshot and save it as a PNG image.
imageThis command displays various information, including debug information.
Available sub-commands:
show bindings - lists all console bindings (macros).show extents - toggle displaying of names and sizes for all objects on the screen.show ai - toggle displaying of AI paths and prints all AI decisions to console.show gui - toggle graphical user interface.This command lists various in-game spells, items, monsters, maps and players.
These commands prints item IDs that can be the used with spawn command.
Available sub-commands:
list staffs - lists all staves and wands.list armor - lists all armor.list weapons - lists all weapons.list food - lists all consumables.list monsters - lists all monsters and NPCs.list spells - lists all spells.list maps - lists all maps.list users - lists all players.This command switches current game map to the one specified:
load wiz01aIn vanilla Nox, not every map can be loaded like that. For example, it’s impossible to load campaign maps in multiplayer.
OpenNox allows bypassing those restrictions by using set maps allow.all command.
A vanilla cheat for invulnerability, all spells and infinite mana.
set godTo disable:
unset godNote that using this cheat will cause the character to learn all spells up to the maximal level. This cannot be reversed, even if the cheat is disabled. See cheat god if you only need invulnerability and infinite mana.
These command allow more controls for Nox Quest game mode. See this page for details.
These commands allow more control for game map loading.
set maps allow.all - disable game mode checks when loading the map; allows loading campaign in multiplayer, etcA cheat for invulnerability and infinite mana.
cheat godTo disable:
cheat god 0For additionally getting all spells see cheat sage, or set god.
A cheat for getting all class spells, scrolls and/or abilities.
cheat sageTo disable:
cheat sage 0A cheat for getting all spells.
For getting class spells:
cheat spellsFor getting class spells with a specific spell level:
cheat spells 3To get all spells, even hidden ones:
cheat spells allA cheat for getting all beast scrolls.
cheat scrollsTo disable:
cheat scrolls 0Teleport to given coordinates or a waypoint.
For teleporting to coordinates (X, Y):
cheat goto 1000 2000For teleporting to a waypoint:
cheat goto MyWaypointSpawn a given item or monster at the player’s position.
Command accepts IDs returned by the list command.
cheat spawn OblivionOrb
cheat spawn Mimic
It is also possible to specify a number of items to spawn:
cheat spawn RedApple 5Adds specified amount of gold to all players.
cheat gold 10000Sets or restores health for the character.
Without arguments, command will restore health to maximum:
cheat healthYou can also specify the desired health value:
cheat health 999Sets or restores mana for the character.
Without arguments, command will restore mana to maximum:
cheat manaYou can also specify desired mana value:
cheat mana 999Removes equipment requirements from all items. In other words, any class can equip and use any armor/weapons.
cheat equip.allTo disable it:
cheat equip.all 0Allows charming any hostile creatures and NPCs (including scripted ones, humanoids, etc).
cheat charm.allTo disable it:
cheat charm.all 0The game may become unstable and crash, when using this command!
Remove the limit for the number of summoned creatures.
cheat summon.nolimitTo disable it:
cheat summon.nolimit 0This commands executes given Lua code.
For example, to replicate cheat spawn RedApple with Lua:
apple = Nox.ObjectType("RedApple")
p = Nox.Players.host
apple:Create(p)
In the console, each line must start with lua command:
lua apple = Nox.ObjectType("RedApple")
lua p = Nox.Players.host
lua apple:Create(p)
Notice that variables defined in one lua commands can be used in other ones.
It’s also possible to write a multi-line command in a single line:
apple = Nox.ObjectType("RedApple"); p = Nox.Players.host; apple:Create(p)or
Nox.ObjectType("RedApple"):Create(Nox.Players.host)For more information about Lua scripting, see this page.